How do I change the font or style of a token?
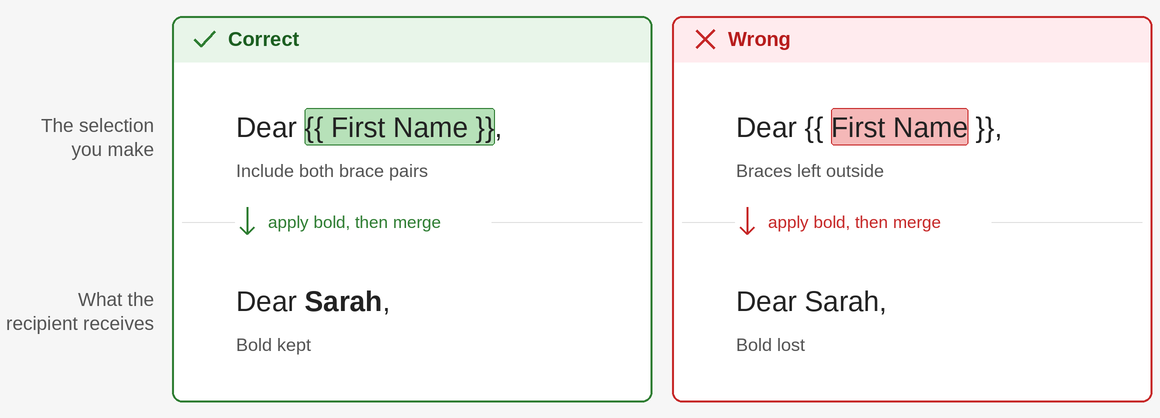
A token keeps a font, size, colour or bold setting when your selection covers the whole token, both pairs of curly braces included. Format only part of it and the styling is removed when the email is merged. Formatting a whole line or the whole message is the safest option.
Formatting Personalization Tokens
Select the whole token, including both pairs of curly braces, then apply your font, size, colour, bold or italic. In {{ First Name }} the selection has to run from the first { to the last }. A selection that covers only First Name does not keep the style.
For consistent formatting across a greeting or the whole email, select that larger area instead. Any tokens inside it are covered automatically.
Options for Consistent Message Styling
- Whole message. Select the entire body (Ctrl+A, or Cmd+A on Mac) and apply the font and size. Use this when the whole email should be in one typeface.
- A line or paragraph. Triple-click it, then apply the formatting. Useful for a styled greeting such as
Dear {{ First Name }},. - One token. Drag from just before the opening
{{to just after the closing}}. Use this when only the merged value should stand out, for example an invoice number in bold.
Two habits catch people out when formatting a single token:
- Double-clicking selects a word, not the token. In
{{ First Name }}you getFirstorName, and the braces stay behind. - Ctrl+Shift+arrow also moves by word, so it can stop between the column name and the closing braces.
If in doubt, extend the selection a character or two into the surrounding text.
Best Practice for Writing Emails
- Write the plain text of your email.
- Insert the tokens with “Select a column to add to your email:” and the “Add to body” or “Add to subject” buttons.
- Apply your formatting last, selecting whole lines or the whole body where you can.
- Send a test email with “Send test email to yourself”.
The test email uses the first row of your spreadsheet, so check the formatting of the merged values themselves, not just the text around them.
Note for Conditional Tags
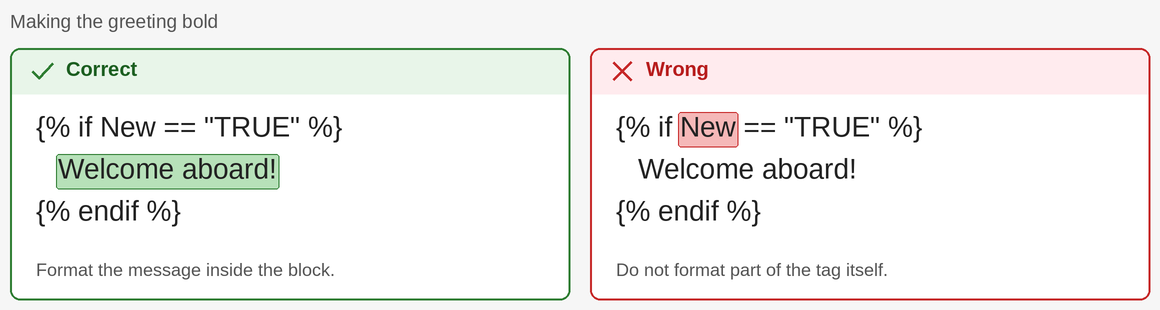
SecureMailMerge only removes stray HTML from inside {{ ... }} tokens, not from the control tags used by conditions, which look like {% if New == "TRUE" %}. Formatting part of a condition tag can leave HTML inside it, which can fail with a Liquid syntax error.
Apply formatting to the content between {% if %} and {% endif %} instead. That is the part your recipients see.
How much formatting to use
Formatting in email is a request, not a guarantee, and clients apply their own rules. Keep the email in one readable typeface and use bold sparingly, and if your template does use a more involved design, send a test to a couple of different clients before starting the campaign.
Frequently asked questions
Why did bold formatting disappear from my token?
Why does a partly selected token lose its style?
What happens if the formatting splits a pair of braces?
Do I have to format each token separately?
Does the merged value keep the formatting of the token?
When should I apply formatting, before or after inserting tokens?
See also
Ready to improve your mail merge?
SecureMailMerge for Outlook
Runs inside Outlook, with no external app needed.
Free version, no credit card required.
Purchase license to remove promotional footer.