How do I add custom headers or List-Unsubscribe?
How to add a custom header, like List-Unsubscribe, to your mail merge and use it to control mail flow. A step-by-step guide for Outlook.
Open advanced options
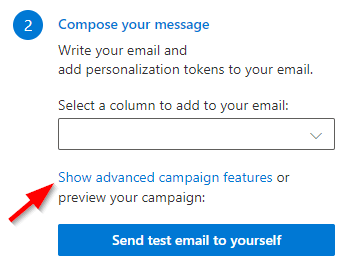
In the campaign manager select the link that shows or changes advanced options. The advanced options reference describes the whole screen, including what carries over to your next campaign.
Both settings described below are in the “Mail headers” group, the last of the three.
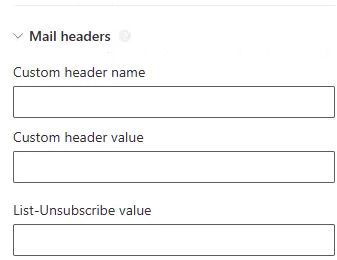
Option: Custom Header Name and Value
If you want to add a custom header to the email in order to process messages sent through SecureMailMerge in your Exchange mail flow settings, you can specify the header here.
Note that custom headers must start with x- (e.g. x-sent-by or x-mycustomheader).
Option: List-Unsubscribe Header
If you wish to add a List-Unsubscribe header you can specify the value here. This is what tells Gmail, Outlook.com and Apple Mail to show an “Unsubscribe” link at the top of your message, next to your name.
Unless you are using a third-party service for subscription management it is recommended to set the value to (including the angle brackets):
<mailto:you@yourcompany.com?subject=unsubscribe>and replace you@yourcompany.com with your email address.
What happens when someone clicks “Unsubscribe”?
With a mailto: value like the one above, the recipient’s email provider does not contact any website. Instead it asks the recipient to confirm, and then sends you an ordinary email from their own address, using the subject you specified in the header. The unsubscribe request simply arrives in your inbox, and you remove that person from your list yourself.
To make those requests easier to identify, you can include the recipient’s address in the subject line using a merge field:
<mailto:you@yourcompany.com?subject=unsubscribe {{Email}}>This matters more than it looks. People often read mail on an address that forwards to another mailbox, so the address the unsubscribe email arrives from is not always the address you originally mailed. Putting the merge field in the subject means you always know which row of your spreadsheet to remove. You can then filter or search your inbox for “unsubscribe” to collect the requests.
Remember that you are responsible for actually honouring these requests, and both Google and Microsoft expect opt-outs to be processed within two days.
One-click unsubscribe and high-volume senders
Google (since February 2024 ) and Microsoft (since May 2025 ) require one-click unsubscribe from senders who send more than 5,000 messages per day to their users. Microsoft rejects non-compliant bulk mail with a 550 5.7.515 error.
One-click is a stricter standard ( RFC 8058 ) than the header described above. It requires a web address that accepts automated unsubscribe requests, plus an additional List-Unsubscribe-Post header. SecureMailMerge cannot currently send that second header, because the Microsoft 365 interface we use to send your mail does not allow it, so a mailto: value does not make you one-click compliant.
In practice this only affects you if you exceed 5,000 messages per day to Gmail or Outlook.com addresses, which is well above the volume of a typical mail merge and above the sending limits of a Microsoft 365 mailbox anyway. Below that threshold, a mailto: List-Unsubscribe header together with a visible unsubscribe line in your email body meets both providers’ requirements. If you do send at that volume, you need a dedicated bulk email platform.
Dynamic values for the header values
Instead of using the same value for all recipients, you can also read this value from a spreadsheet field. For this simply enter the name of the field in curly brackets. For example if you have a column named “HeaderValue1” in your spreadsheet, you can enter {{HeaderValue1}} as the value.
This applies both to the custom header value field and the List-Unsubscribe value.
Testing
In order to see the header fields in Outlook (either in your test message or Sent Items) you need to open the message, click on “File” in the menu (if you don’t see it, open the message in a separate window) and then select the “Message Options” tab. There you will see the headers in a plain text format.
Ready to improve your mail merge?
SecureMailMerge for Outlook
Runs inside Outlook, with no external app needed.
Free version, no credit card required.
Purchase license to remove promotional footer.