How do I send only on certain days and hours?
Restrict a campaign to office hours, to weekdays only, or to a set number of messages a day. Four steps, then the rules for what happens to the messages that do not fit.
By default a campaign starts sending as soon as it has been generated and keeps going until it is finished, on any day, at any hour. Three settings change that: the days of the week it may use, the hours of the day it may use, and how many messages it may send per day. You can set one, two or all three.
The short version
- Open the advanced options from the campaign manager.
- Open “Schedule”, then “When to send”.
- Untick the weekdays you do not want under “Send only on”, and set a start and end time under “Send between”.
- Optionally tick “Limit how many are sent each day”.
The rest of this page walks through those steps and then explains what happens to a message whose turn falls outside your schedule.
Step 1. Open the advanced options
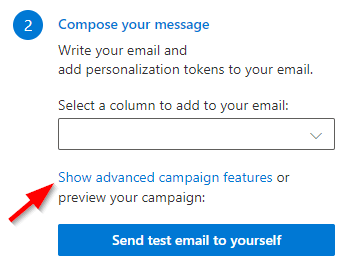
In the campaign manager select the link that shows or changes advanced options, then open the “Schedule” group and the “When to send” subgroup. Everything on this page is in there. The advanced options reference covers the rest of the screen.
Step 2. Choose the days
Under “Send only on” there is one checkbox per weekday, Monday first. Untick the days your campaign should skip. In the example below, the campaign may send on any day, because all seven are still ticked.
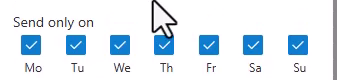
For a campaign that only sends on working days, untick Sa and Su. All seven days are ticked on a new campaign, so until you change something, nothing is restricted.
If you untick every day, the add-in treats that as “any day” rather than as a schedule that can never run, and it shows a warning while no day is selected. Campaigns created before this setting existed also behave as “any day”.
Step 3. Choose the hours
Under “Send between” there are two dropdowns, a start time and an end time. Both are empty by default, which means any time of day.

Set both to restrict sending to that window, for example 09:00 and 17:00 to stay inside office hours. The end time cannot be earlier than the start time, so a window that runs across midnight is not possible.
Step 4. Cap the messages per day (optional)
Tick “Limit how many are sent each day” and set the number of messages “per day”. Ticking the box fills in 50, which you can change to anything you like.
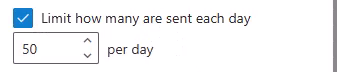
The limit counts calendar days, not rolling 24-hour periods. It is the simplest way to spread a large campaign over a couple of weeks, or to stay comfortably below the sending limits Microsoft enforces on your mailbox.
Check what you set
The “Schedule” group opens with a one-sentence summary of everything you have chosen, so you can confirm the schedule without reading each control.
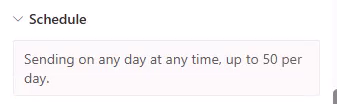
Back in the campaign manager, the same settings are listed as active options above the send button, so you can check them right before sending.
What happens to messages that do not fit
Your settings combine rather than override each other. A message is scheduled at the first moment where all of these are true:
- The moment is inside your “Send between” window.
- The day is one you ticked in “Send only on”.
- That day has not yet reached your “Limit how many are sent each day” number.
Anything that does not fit moves forward. A message whose turn falls on an excluded day is moved to the next selected day and scheduled at the start of your daily time window. A message that arrives after a day is full moves to the next selected day too.
So a 400 recipient campaign set to weekdays only, 09:00 to 17:00, 50 per day, sends 50 messages each working day and finishes eight working days later, skipping the weekend.
To choose the date the whole thing begins, use “Start sending on” in the same subgroup. See scheduling for a specific day.
Things to know
- Your schedule is remembered. It is reapplied to your next campaign and survives replacing the spreadsheet, so a schedule you use every week only has to be set once. See the advanced options reference for exactly what carries over.
- Test emails ignore all of this. A test email is always sent immediately.
- Outlook only needs to stay open while the campaign is generated. SecureMailMerge generates the messages in your Drafts folder while Outlook is open, then hands them to Microsoft 365 with a send time using Outlook’s own scheduled send. Microsoft 365 sends them on schedule whether or not Outlook or your computer is on.
- Pausing does not reset the schedule. A paused campaign keeps the schedule it started under, and resuming continues the original plan rather than restarting from the moment you resumed.
Checking that it worked
The scheduled time is not visible in Classic Outlook on the desktop. To see it, open the same mailbox in New Outlook or Outlook on the Web, where the messages in your Drafts folder show when they are due to go out.

Ready to improve your mail merge?
SecureMailMerge for Outlook
Runs inside Outlook, with no external app needed.
Free version, no credit card required.
Purchase license to remove promotional footer.